10 MIN. READ
Build your brand using an online store
How to create custom storefronts and product detail pages on Amazon
£25 (excl. VAT) per month + selling fees
Steps to build your brand store
Follow these steps to showcase your brand on Amazon. Keep reading for detailed instructions.
- Get started: Create a Professional seller account.
- Enrol your brand in Amazon Brand Registry.
- Add products and use A+ Content to customise your Amazon listings.
- Create a unique storefront for your brand using the Amazon Stores tool.
Bonus steps:
- Optimise your customers' mobile brand experience.
- What's next? Use more tools to grow and distinguish your brand—all included with your seller account.
Get started: Create a Professional account
Amazon is a popular store—which makes it a great opportunity for online sellers. In fact, independent third-party sellers sold more than a billion items during the 2019 holiday season alone, using Amazon to reach hundreds of millions of customers, build their brands, and grow their business.
Still, it can be a little daunting to start an online business.
Still, it can be a little daunting to start an online business.
New to Amazon? Sign up for professional account
One of the best ways to stand out and look good on Amazon is to sell your own brand of products. Not only can that give you the opportunity to sell your unique product, but we’ve also built a lot of free tools that allow you to build an online store for your brand, as well as help protect your brand name, showcase your wares, and connect with customers.
See an example brand store below.
See an example brand store below.

Next, to showcase your brand on Amazon without diminishing your style, you’ll need to:
Let’s take a closer look at each of these tasks.
Enrol your brand

Amazon Brand Registry helps protect your intellectual property and guard your brand’s good name on Amazon.
Amazon Brand Registry automatically registers your brand in all European countries at no extra cost.
Adding your company to Brand Registry is also how you get access to all of the free tools, reports, and benefits that come with selling your brand in the Amazon store.
To enrol your business in Amazon Brand Registry, you’ll need:
- An Amazon seller account (sign up now).
- An active registered trademark in the country where you want to enrol, or a pending trademark application filed through Amazon IP Accelerator.
- Your brand name or logo displayed prominently on your products and packaging.
If you meet the criteria, here’s how to sign up for Amazon Brand Registry:
- Go to brandservices.amazon.co.uk/eligibility and click “Enrol now.”
- Choose the country-specific marketplace in which you want to enroll your brand.
- Follow the prompt to log in to Seller Central.
- Complete the brief form by providing information about your business as it appears on legal documents or trademark applications.
- After you submit the form, you’ll be directed to the Brand Registry page connected to your seller account. Select Manage >> Enrol a brand
- Follow the steps to submit your enrolment for review.
The information you provide during enrollment will depend on the country-specific marketplace where you want to enroll. In the United Kingdom, for example, Amazon Brand Registry requests:
- Trademark registration number with the UK Intellectual Property Office (UK IPO)
- Your “brand marks,” which could be words/text or an images/designs (such as a logo).
- Product categories in which your brand products should be listed for example, apparel, sporting goods, electronics, etc.).
- Countries where your brand’s products are manufactured and distributed.
Customise product detail pages with A+ Content

Once your brand is approved for Amazon Brand Registry, it’s time for the fun stuff. Brand Registry unlocks free tools that help you manage your brand products behind the scenes and manage your brand story as it appears for customers shopping the Amazon store.
With A+ Content and Stores, you can build a beautiful brand experience on Amazon. A+ Content enhances your product listings, and Stores allows you to create a multi-page shopping experience within the Amazon store.
With A+ Content and Stores, you can build a beautiful brand experience on Amazon. A+ Content enhances your product listings, and Stores allows you to create a multi-page shopping experience within the Amazon store.
When you add a product to the Amazon store, customers will see the offer on a product detail page. The standard version looks something like this:

With A+ Content, you can enhance the product detail page by adding your own brand flourish to create something like this:

Add A+ Content to your brand products on Amazon by following these steps:
- Log in to Seller Central.
- In the navigation menu, select Advertising >> Enhanced Brand Content
- Enter the SKU of the product to which you want to add content. If you add content at the parent level, the template will publish to every child as well.
- Select from the available modules or select from one of the pre-defined templates
- Follow the prompts at the top of the page: Add images that maximise the allotted space, add text to the designated text boxes to describe the details or features of your product.
- Preview the page to make sure all the images are loaded properly and it looks like your other branded pages to provide customers a consistent experience with your brand.
- Submit to Amazon. Review can take 7 business days (longer during peak periods), and content status will update on your dashboard Approved content can take 24 hours to appear.
- If your content submission is not approved, select “edit” in your dashboard to modify the page and then resubmit. To avoid having to edit and resubmit your content make sure your content:
- Has clear images that are visible on desktop and mobile devices
- Is free of spelling or grammatical errors.
- Does not contain specific pricing or promotion details.
- Does not reference warranties, guarantees, customer service, websites, or contact information
- Complies with A+ guidelines
Tips for how to use A+ Content features:
- Text: Provide detailed explanations with specific words and numbers to help customers become experts on your product.
- Tables: Use comparison tables to highlight features across your product line.
- Banners: Use banner images to show your products in use. Add your brand logo and content to all of your products to create a consistent brand experience.
- Images: Use professional-quality, high-resolution images that highlight product features or show your product in use. If you add brand text to your images, make sure it’s large enough to be readable on mobile devices.
- Fields: Use text fields—rather than embedding text in images—to improve your visibility in search results (SEO).
- Mix and match: A+ Content modules offer 100+ combinations of image and text fields. Explore them all to find the right mix for your brand.
- Mine reviews: Use information from customer reviews, returns, and communication to figure out what topics to cover. Address purchasing barriers. Think about why customers wouldn’t buy your product and discuss those concerns in advance.
- Tell a story: Describe your brand’s mission, story, and unique production process. Provide detailed feature information with specific data. Use a helpful, informative voice.
Build a store for your brand within the Amazon store

Amazon is an online store, and brands that sell products in the Amazon store can build their own online store within the store using a free tool we call...um, Stores.
Once you create a seller account and enrol in Amazon Brand Registry, you can build a store that provides customers with a multi-page, immersive experience that introduces customers to your brand story and entire product catalogue through customised rich media—text, image, and video.
You also get your own Amazon.co.uk web address to use in marketing campaigns (amazon.co.uk/yourbrand). Think of it as your Amazon real estate, where you can showcase new products and best sellers, and even provide personalised recommendations for shoppers who visit.
Behind the scenes, Stores also provides you with performance metrics about visits, traffic sources, and sales so you can optimize the experience.
Using Store Builder in Seller Central, you can create an ecommerce storefront on Amazon—no coding or design expertise required. The page is automatically set up for desktop, mobile, and tablet browsers.
Build your own brand experience using Amazon Stores by following these steps:
- Create a seller account and enrol your brand in Amazon Brand Registry.
- Log in to Seller Central.
- In the navigation menu, select Stores >> Manage Stores
- Click the “Create Store” button.
- Choose a template for your Store. Each one includes adjustable tiles for images, text, video, and other content. The template options include:
- Product Grid - A simple way to display your brand selection.
- Marquee - Include a curated product display with additional space for imagery, product descriptions, and customer quotes.
- Showcase - A flexible option for brands with a broad selection of products, featuring plenty of space for product information and rich visual content.
- Open Store Builder to build an online store for your brand within the Amazon store.
- Click on Page Manager and select "Add a page" to add a page to your online store. Enter the page name and description, and choose a page template.
- Use the Tile Manager to add and arrange content to the page. Combine product images, text, and video to create an engaging experience.
- Handpick products to feature in your store or use dynamic widgets to automatically populate different product displays, such as best-selling products or recommendations based on visitor behaviour. Dynamic widgets use Amazon data such as keyword search, best-selling products, and/or recommendation history to help you optimise and update the products that appear on your store.
- Use the Preview Window to see how your store will appear for desktop and mobile browsers. Click on an individual tile within the page to edit.
- Repeat steps 5–7 to create multiple pages in your store as needed to showcase different features, product categories, top sellers, etc. Each page can navigate to a different page within your store, up to three levels deep.
- Once you’ve finished building your store, click “Submit for publishing.” Publishing your online store involves a moderation process that can take several days. Keep an eye on the Status Bar to monitor progress. To avoid rejection during moderation, please review the Creative Guidelines.
- After your store is live, go to Store Builder >> Insights to see how your online store is performing. Track page views, visitors, traffic sources, and sales to update and optimize your store.
Bonus steps

Optimise your Store for mobile
Consumers are spending more and more time on their mobile devices and this is fuelling the growth in mobile retail. Mobile has changed the way people shop. In the first quarter of 2020, two-thirds of Store visits were made from a mobile device.1
With such a large number of shoppers using mobile devices to access your Store, it makes sense to prioritise a mobile-friendly design.
We know that with the myriad of screen sizes, resolutions, device types, and browsers, designing for both mobile and desktop customers is complex and constantly evolving. To get you started, we're sharing 6 tips from the Stores design team that will help you optimise your Store for mobile shoppers.
1Amazon internal data, WW, 2020.
6 tips to optimise your Store for mobile
Test on mobile device
Testing your Store on mobile will help you discover errors that can affect your mobile shoppers’ experience. The best way to make the right adjustments is by discovering for yourself what type of customer experience your Store provides on mobile. Step away from your desktop/laptop computer and access your Store on a phone or tablet. Tap through pages and tiles. Is your Store easy to navigate? Are the texts and graphics easy to read?
To test out your Stores experience:
1. Click Preview > Share Preview in Store builder.

2. Copy the preview link
3. Paste this preview link in an email or anywhere where you can access from your phone (Tip: Include the preview link’s password on a separate line so it’s easier to copy and insert it later on).
4. Navigate through your Store on your mobile device as if you were a shopper and take notes on what needs to be improved. Is it easy to navigate? Can you find the products or information that you’re looking for? How do your images look on a mobile device?
Use the custom mobile layout option
Because of the screen size difference between a desktop monitor and a phone screen, sometimes a tile design is legible on desktop but not on mobile. Although Stores will automatically adjust images for different screen sizes, this doesn’t mean every element will be legible on mobile, especially if the text looks small on desktop to begin with.
In these cases, we recommend using the custom mobile layout option in Store builder. This allows you to add two separate images, one optimised for desktop and one for mobile. This option is only available for image tiles, and it can be found by scrolling down on the “Editing: Image” panel.
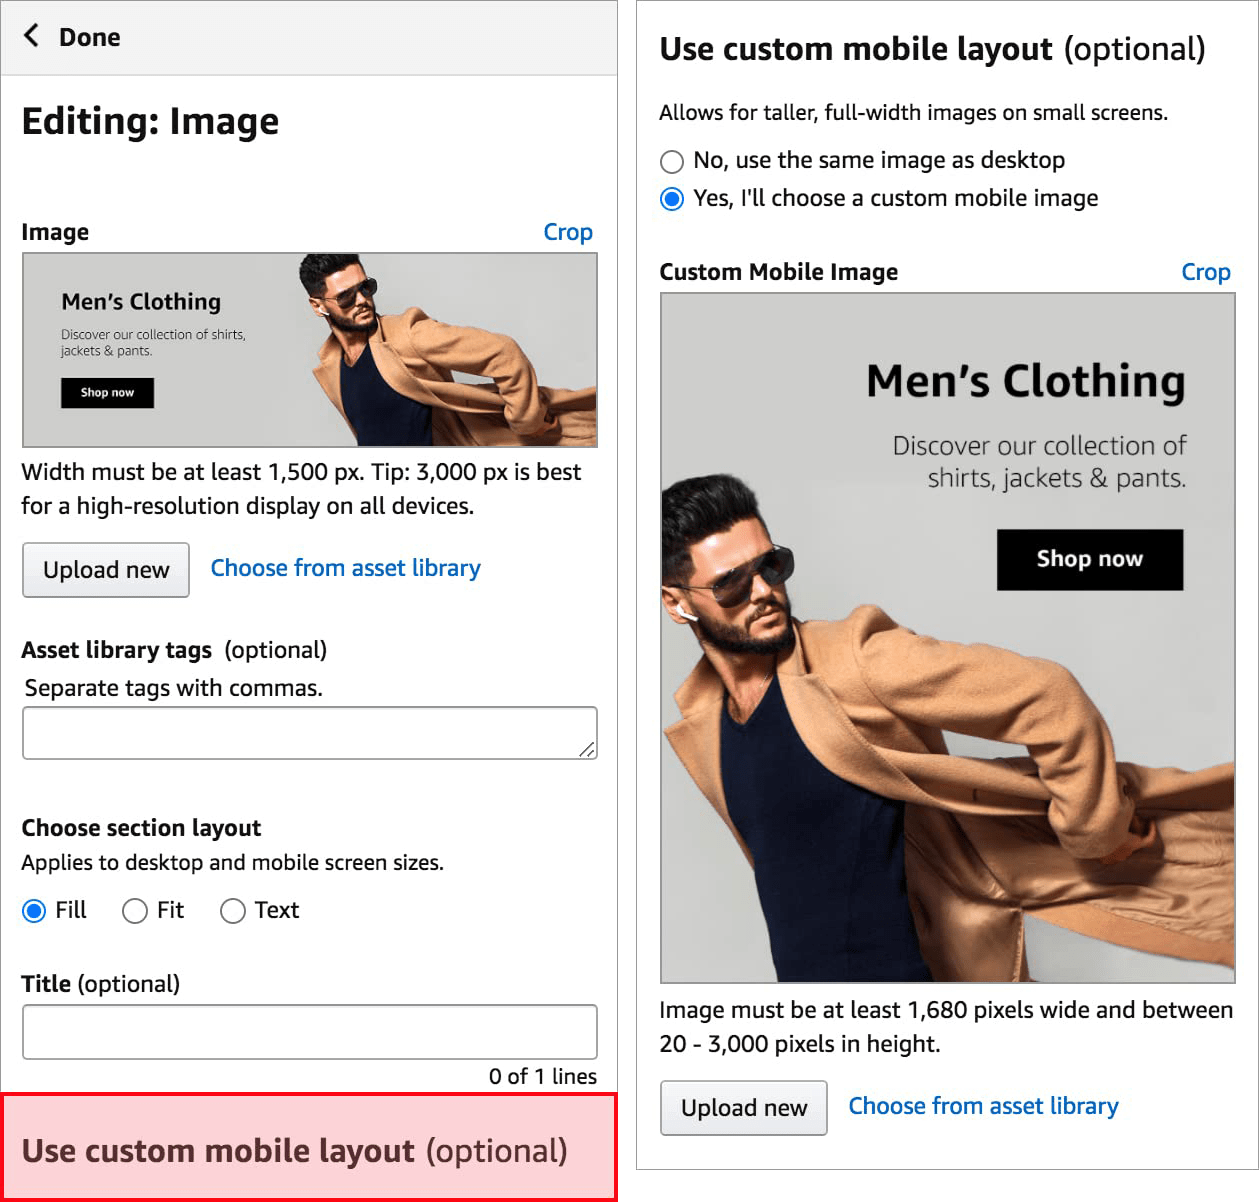
Example of a custom mobile layout:

Make sure content appears in the right order
Mobile screens are narrower and designed for faster scrolling, which means that the order and layout of content is not precisely the same for your Store on desktop and mobile. Mobile Stores use a left-to-right row prioritisation for the order of content. See below for an example.

Check your Store on a mobile device to confirm that content is appearing in the right order.
Optimise your header image
Even with custom mobile layout, you can only use a single image for your header. The header image is 3000 pixels wide on desktop and is automatically reduced to half (1500 pixels) on mobile. This dynamic resizing shrinks all graphic elements within the header, including text.
Because of this, please keep in mind the following:
- Try limiting the number of products on a header to three. The more products you use in the header, the more cluttered it will look on mobile.
- The copy in the header should be less than 30 characters so you can increase the size of the text to be legible on mobile and desktop versions without overwhelming the header. For this we recommend a minimum font size of 100pt Arial regular font or equivalent.
Choose an effective call-to-action (CTA) placement
Research has shown readers typically read top to bottom, scanning left to right. Keeping this flow in mind can help you choose an effective placement for your call-to-action (CTA) button on mobile.
Consider the importance of above-the-fold elements, which are the parts of the Store page that are viewable before scrolling down. If a CTA is placed at the bottom of a vertical tile, it is unlikely to appear above the fold, making it less visible to customers.
CTAs on mobile should also have decent spacing around them, or “breathing room,” so it's easy for customers to find and click on it. Having limited space for a CTA can cause it to merge with its surroundings and lose hierarchy and visibility.
Provide alternatives to menu navigation
The navigation menu on a Store appears differently on desktop than on mobile. On desktop, shoppers see multiple tabs along the navigation bar. On mobile, shoppers see a single drop-down menu. See the images below for a comparison.
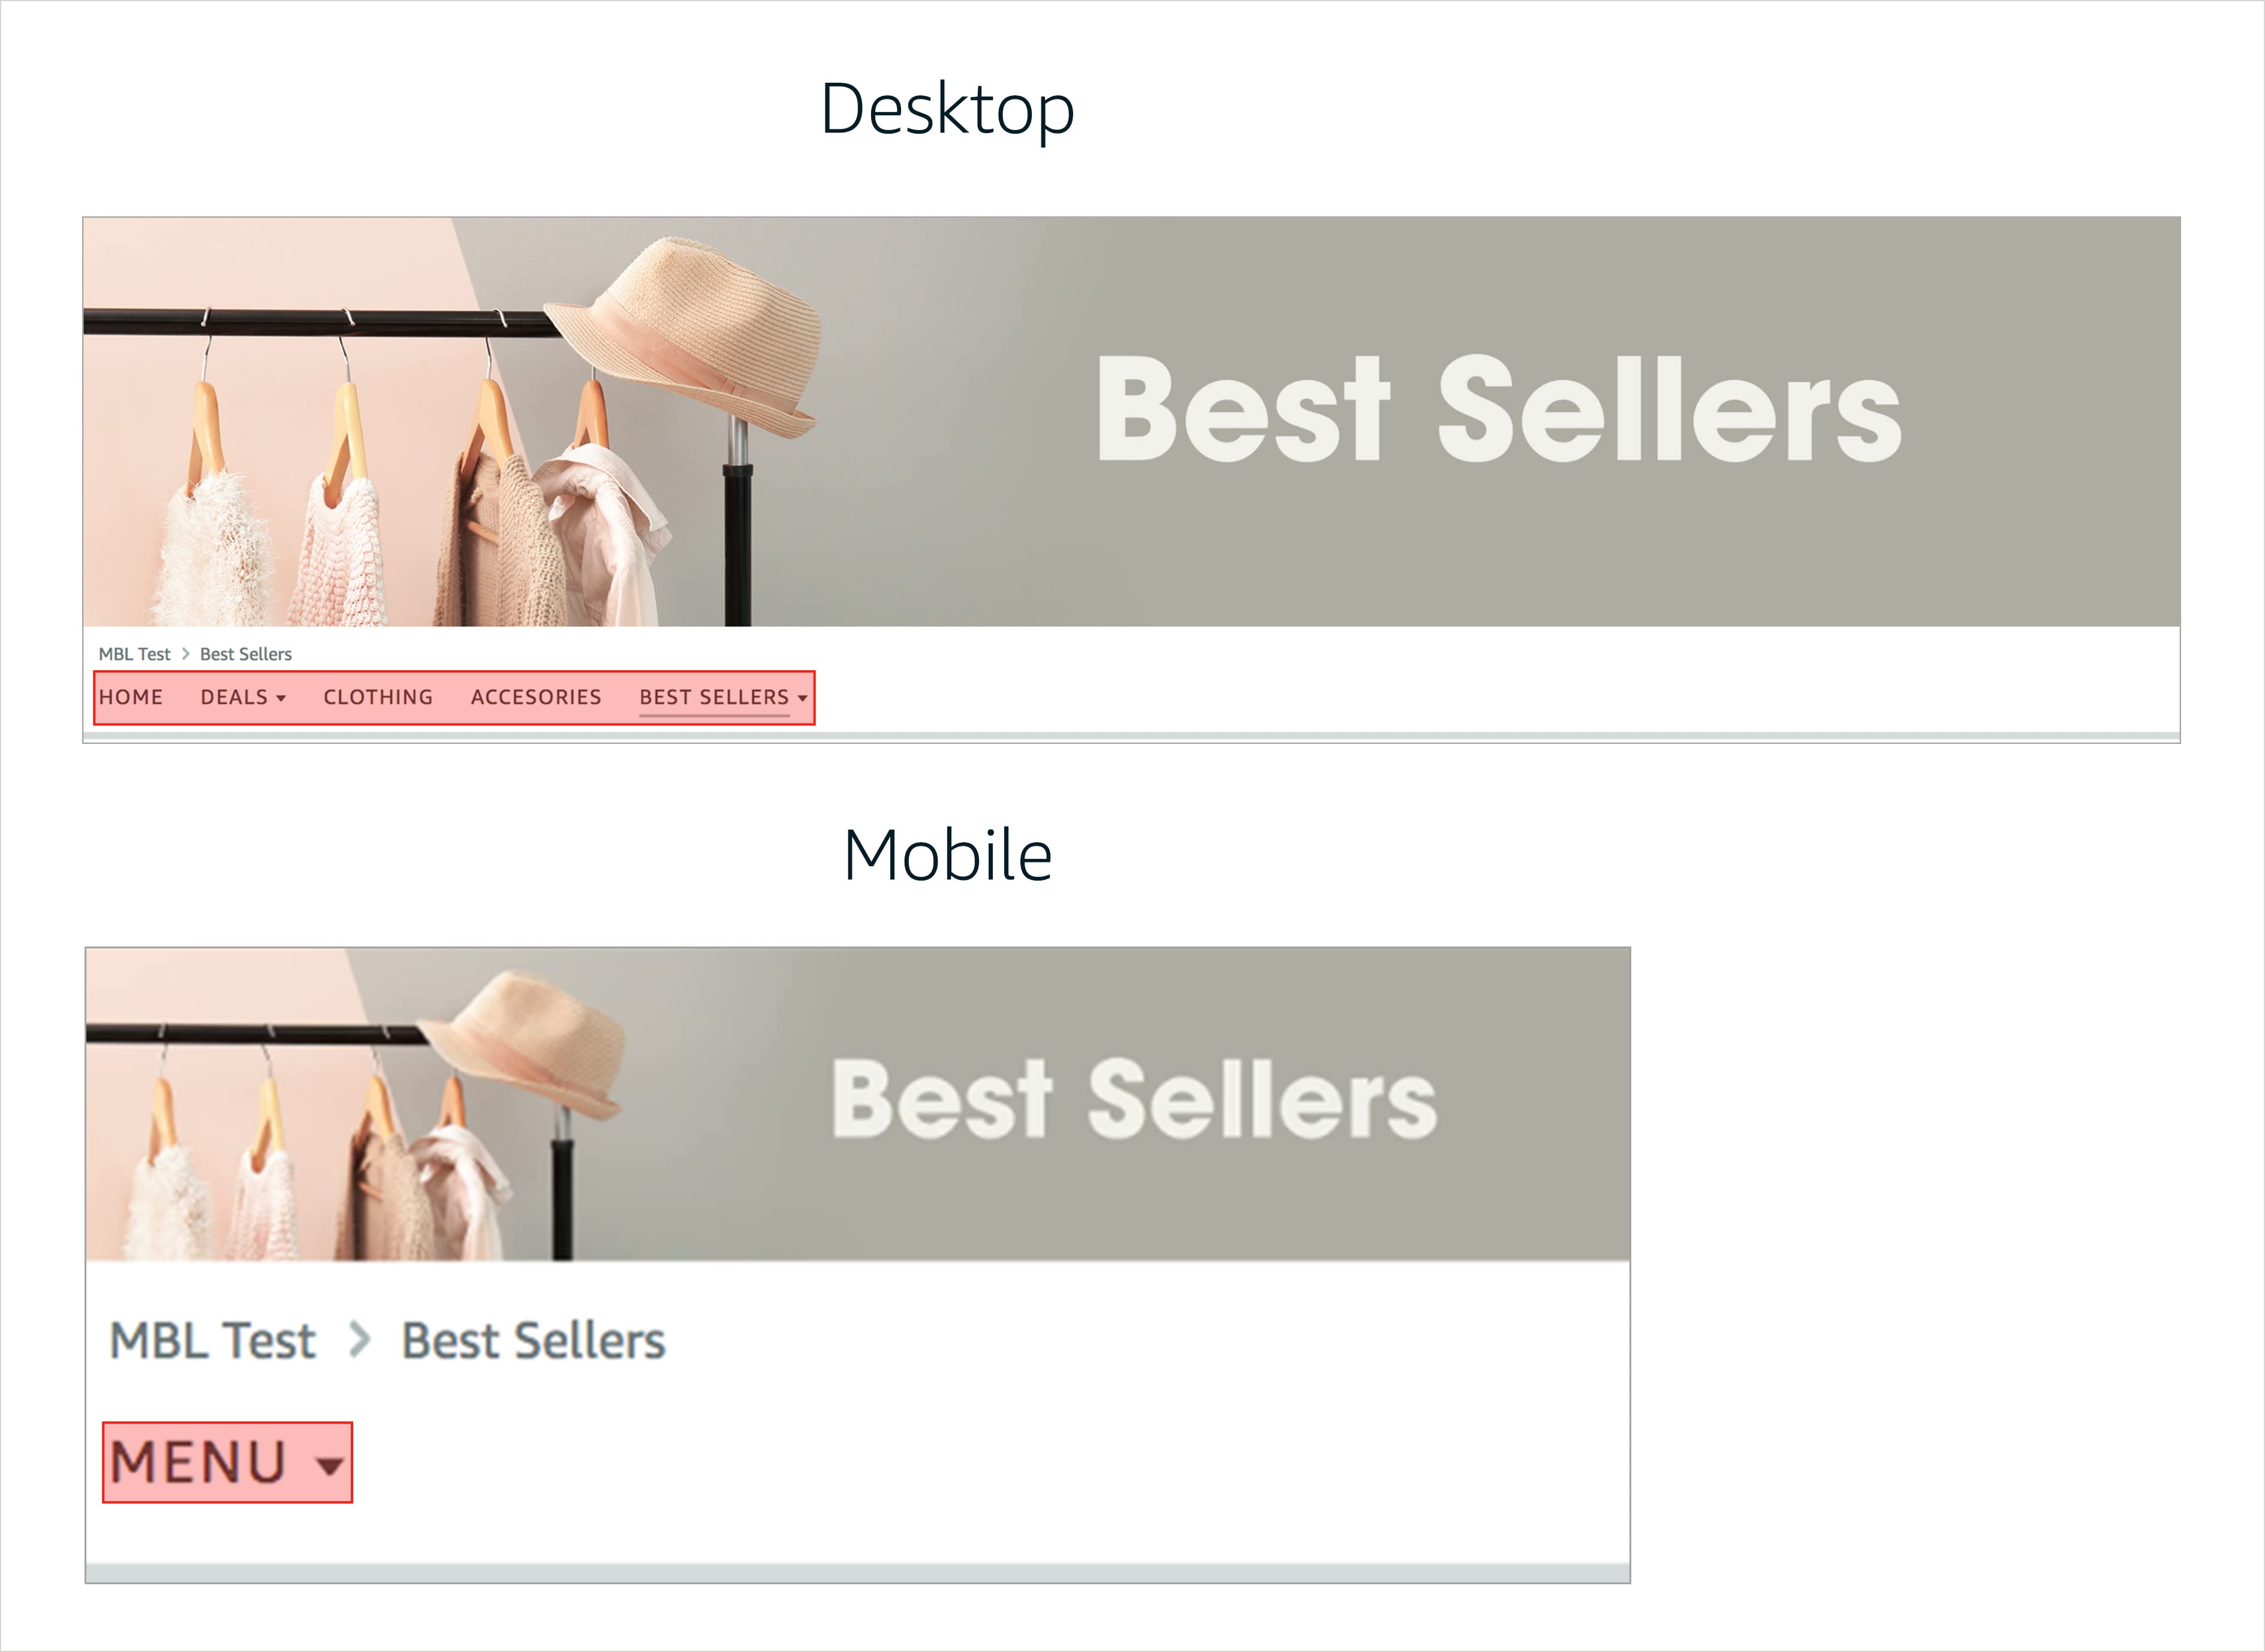
This is an important factor to consider when it comes to highlighting your top categories or tabs on a Store. Putting those top pages in the menu is one good strategy, but you can also use image or text tiles to create an additional way to navigate your Store. Adding these tiles at the top of your Store, along with a strong CTA, ensures shoppers can find your most important content even if they don’t expand the drop-down menu.
Ready to start optimising the mobile experience of your Store?
What's next? Use more tools to grow and distinguish your brand
You’re enrolled in Amazon Brand Registry. Your ecommerce business has an Amazon storefront and your own Amazon.co.uk web address. Your product detail pages feature rich information added with A+ Content.
What next?
Once you build an online store within the Amazon store, take advantage of the many other ecommerce marketing and online seller tools we’ve created to help brands reach more customers.
Drive traffic to your Amazon store and product listings using Sponsored Brands, Sponsored Products, and other Amazon Advertising strategies. Use your unique Amazon URL to marketing campaigns on and off Amazon.


On this site, we use cookies and similar tools (collectively, "cookies") to provide and improve services to you and to show ads. To learn more about how Amazon uses cookies, please read the Amazon Cookies Notice.